I have made progress on the wall cabinet in the last week or so, but it has been agonizingly slow. After finishing the hinge mortises I began work on the stop and latch mechanism.
I added a thin stop, 1/16" thick, at the bottom of the cabinet. It's glued to the inside. I measured carefully, marked where it needed to go, and glued it in. And then I had to remove it and replace it. At this point I can't remember why.
The upper stop/latch mechanism is more substantial. It consists of a 3/4" X 1/2" X 3" block with two super strong magnets super-glued into it. The doors each have a magnet washer screwed into the inside corner. I wasn't paying enough attention when I drilled the recess for the magnet washers, and managed to get one on the hinge edge of the door instead of the non-hinge edge. That happened to be the first one and I'd used super-glue to attach it. That boo-boo is now covered with a circle of veneer.
Again I carefully marked and measured the location of the stop block/latch on the inside of the cabinet, and transfered the measurements to the top. I'm attaching the block with screws from the top. The holes are then filled with plugs. So in attempt number 1 I drilled the pilot holes, applied glue to the block, screwed it in, clamped it for good measure and left it to set.
The next day I took off the clamps and closed the doors to check on the alignment. Imagine my surprise when the doors wouldn't shut. I quickly surmised the the problem. When I transfered the measurements from inside the cabinet to the top, I forgot to take into account that the screw holes need to be in the center of the block. The line I'd transferred and drilled along was the marking for the front of the block - not the center.
Fixing this required - drilling out the plugs, removing the screws and sawing off the block. After constructing another block and marking the lines again, I screwed on the block - no glue this time - as a dry fit. The fit was perfect so I removed the block, added glue and screwed it back into place. And just in case I decided to wait before plugging the screw holes. I did super-glue in the magnets, though. All looked good, and I headed upstairs for the night.
Next time I made it into the shop, I discovered that gravity had been at work. The magnets in the stop/latch are recessed into flat bottomed holes. When the stop is attached to the cabinet they are on edge. When I'd left the shop after attaching the stop and gluing in the magnets I'd left the cabinet upright. One of the magnets had not set before I left and had slid out so that it rested at about a 45 degree angle to the block - and then it set. This was just not going to work because the door couldn't shut with the extra impediment of the angled magnet.
My first attempt at a fix was to cut off the portion of the block with the angled magnet and replace just the portion. This proved to be impossible to do well given the limited space inside the cabinet. So I unscrewed and sawed off block #2.
With block number 3, I first dry fit it to ensure it's correct placement. Then glued in the magnets with it independent of the cabinet. And finally glued and screwed it into place in the cabinet. Once it was I added the plugs.
As they say third times the charm.
All that is left to do if finish sizing the shelves. Although I built the cabinet according to the plans, the shelves are too wide! At the current width there is not enough clearance for the doors to shut when the shelves are in place.
Other than finish, and a little sanding, the shelf sizing is the last work to do on the cabinet.
Now I just have to figure out what to do with it. I built it for the experience, not with any plan for its use.
Monday, April 30, 2007
Thursday, April 19, 2007
Wall Cabinet Progress
No pictures tonight, I'll try to post some tomorrow.
I've finished the hinge mortises.
Next step was to adjust the fit of the doors, which were too wide. In the grand scheme of things this is a much better option than too narrow.
While taking a break at work this afternoon, I'd read a discussion on the LumberJocks website about jointing the edge of a board with a handheld router as an alternative to doing it with a split fence on a router table. I've never done either but the fence which came with my router table has a split fence option. So, I decided to give it a try. I started on a piece of scrap. That went well, so I took a deep breath and ran the first door through. It wasn't perfect but it's pretty good. The second door looks even better. So now I have a new technique I can use.
After reattaching the hinges (while listening to, of all things, Donny Osmond on the radio!) I began work on the mechanism to hold the doors shut. I'm going to use rare earth magnets and magnet washers (basically thick washers that are attached with screws. I marked the doors, and drilled the holes for the washers with a forstner bit, and attached the washer in the first door. Amy came down while I was working on this and while I was explaining what I was doing I discovered that I had put the washer on the wrong side of the door. This wouldn't be too much of a problem except I'd decided to use a little super glue to help hold the washer.
I finished up the washer on the second door and the second washer on the first door. Now I just have to figure out how to mask the second washer on the first door.
The construction phase of this project is almost complete. I need to finish trimming the shelves for width (they're a little wide), ease edges on the doors and the case, and attach the block with the magnets which will act as the latch. That's it - the end is in sight.
Monday, April 16, 2007
Wall Cabinet: Hinges
 I'm close to completing construction on the wall cabinet. I spent most of today (it's Patriot's Day in Massachusetts, so no work) in my shop working on the hinge mortises.
Hinge mortises are one of those things which I do by hand. One of these years I may create a jig to do these with my router, but for now I'm content to do them by hand. I'd started them last weekend (I think). I finished up the mortises on the doors today. You may notice a very small sliver of wood at the back of the mortise in the picture. To prevent this from blowing out I clamped a piece of scrap to that edge to back it up while I was cutting.
I also spent a fair amount of time resharpening my chisel during the cutting of the mortises. The maple that the door frames are made of is hard and dulls the chisel pretty quickly.
 After finishing the mortises in the doors I turned my attention to the case, and realized that I needed to plug the holes from the pocket screws that attach the sides to the top, because the hinge mortises extend into that area a small amount. So I glued in the plugs - I already had the maple plugs on hand.
Since I had to wait for the glue to set, I then spent a little time on the stops for the doors. And then there was a small shop accident. While retrieving a clamp from the router table I tripped (not sure if I tripped on the router table or my own feet). I landed on my knee and shoulder on the recently padded floor. See here for the impetus for the padding. The padding helped but I've still got a really unhappy knee. The shoulder doesn't seem too sore. As a result I spent quite a bit of time in commune with an ice pack.
I did make it back into the shop, after promising Amy that I would be extra super careful. I trimmed and sanded the plugs and finished the mortises on the case for one of the doors. I should be able to complete the mortises for the other door on my next trip to the shop. Then I'll be able to determine if any more trimming is needed on the doors. The last bits of construction will be to attach the stop/latch to the inside center of the top and attach the knobs. Then it's on to finishing.
Monday, April 9, 2007
Lumberjocks Thorsen Table Challenge
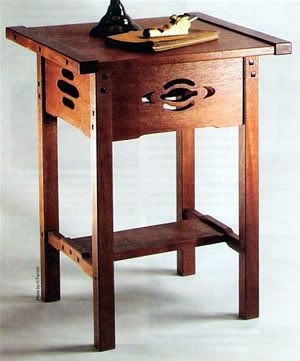
Pictured above is the table that is the basis for the Lumberjocks challenge mentioned here. I decided to jump in and take the challenge.

The second picture is the actual Greene & Greene table which was the inspiration for the table in Popular Woodworking magazine.
The table I'm making will be closer to the first than the second. I'm adding a full shelf, though and making one more change which I'm keeping up my sleeve until I'm further along.
So far I've planned my version of the table and milled the parts. I've glued up the blanks for the top and the shelf. This week in class I'll cut the aprons to length, and cut the mortises in the legs and breadboard ends. I also need to create a jig to create the detail on the edges of the aprons. Mine'll be cherry and walnut another departure from both of the pictured tables.
Saturday, April 7, 2007
Progress Passover Week
 I was able to get shop time in between Passover preparations last weekend as well as on Monday, Tuesday and Wednesday (all vacation days). Thursday night was class night so lots of progress there, and tonight I got in another hour and a half. All in all a very productive week. Listed below is the progress by project.
Wall Cabinet
Construction on the wall cabinet doors is done (see below), the cabinet sides have been trimmed - they were slightly too tall, and I cut pocket screw slots to attach the sides to the the top and the bottom. I also eased the edges of the top, bottom and the shelves.
Night Light
All the parts are cut, except the sides. I've got the stock for the sides cut to width, but still need to cut a series of dadoes in them. I started to do this on Wednesday, but discovered to my great chagrin that I had cut the stock 1/2" too narrow. I'd cut it down on Tuesday and still had the cut off, so I glued that piece back on. Thursday night at class I ran it through the planer to clean it up so now I can cut the dadoes. Once the dadoes, 4 in all, are cut I can cut the individual sides from the stock. After that the major work will be scrolling the light panels.
Challenge Table
After much deliberation I decided to accept the Lumberjocks Thorsen Table Challenge. I acquired the stock and firmed up my plans on Wednesday. Much of my time at class on Thursday was spent cutting parts for the table. I've got legs, breadboard ends for the top, stretchers, apron stock which still needs to be cut into individual aprons, blanks for the shelf and top which need to be glued (the shelf is drying now), and the parts for the drawer. The picture above shows the apron stock, the legs, breadboards and stretchers.
Friday, April 6, 2007
Wall Cabinet Coming Together
 The doors for the wall cabinet are complete. The frame is maple, the panels are walnut. It doesn't show clearly in this picture but the panels are bookmatched.
Woodworking lesson, or what do you mean by bookmatched?
Bookmatched panels are cut from a single board. For example: Start with a board 2" thick is sliced into two 1" thick pieces. The pieces are separated by opening the original board like a book. This creates two pieces on which the grain patterns are mirror images. If you look closely at the picture to the left you'll see this effect in the grain on the walnut panels.
Bookmatching explanation. Click for larger view.

Sunday, April 1, 2007
Sunday Progress
 I only spent a little while in the shop today, because I spent a good deal of time cleaning for Passover and also took a break to attend a Wellesley softball game.
In the shop I worked on the sizing the strips which will hold the panels in the doors of the wall cabinet.
The doors have a rabbet that runs around the inside of the door to hold the panel. To hold the panel from the back I'm using strips that will be pinned in place with brads.
I finished cutting the miters in the strips for one door. I may have to narrow the strips, so that the door handles and hinges will fit. I'll decide on that the next time I'm down in the shop. In the oops category I discovered that I miscalculated and didn't cut enough stock for both doors. The source of the miscalculation is the miter. I forgot to calculate the lengths based on the outside of the strips, rather than the inside.

I also glued up the panel for the top of Snowflake's night light.

Subscribe to:
Posts (Atom)