Showing posts with label foot stool. Show all posts

Saturday, September 22, 2007

Summer Woodworking

My last post was over 2 months ago. Sorry about that. I have done a bit of woodworking since then, although not a lot. Among the other things taking up my time were:
  • We dropped off Snowflake's nightlight and met the man himself - he's a real cutie.
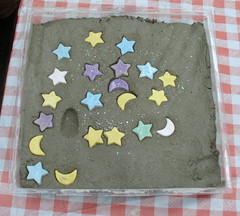
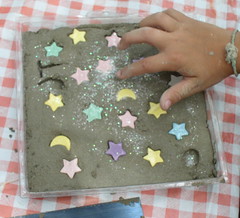
  • I spent a couple of days on the Cape with my sister, her family, their friend and her son. One afternoon I supervised the boys D and JT making stepping stones (concrete, ceramic tiles and glitter). JT was particularly excited about the glitter. I didn't stay long enough to see the hardened stones, but word has it that the boys were fascinated by how the gloppy concrete turned into solid stones.
    D's stepping stone JT's stepping stone
  • We spent the last two weeks of July in the Adirondacks. We've vacationed there all but 2 of the last 12 years, the last 8 in Owl Cabin at Wakanda. Although I took some things to sand with me they never got pulled out. I did take photos and dimensions of an end table (a new addition to our cabin) which will likely end up as a project soon.
  • Like too many other houses, our bathroom has a window above the tub. Since the tub is also used for showers the window gets wet. Over the years water has undermined the window framing, and the wall behind the plastic tub surround. The surround on our tub is several panels rather than a single piece. Over time the seams have lost their integrity and water has infiltrated. As embarrassing as it is to say this, the wall board behind the surround has been falling apart for years. After replacing the toilet and floor, we finally couldn't take it anymore. So in mid-August I carefully removed the surround and replaced the outside wall. Note to anyone reading - cardboard is not an acceptable shim in a bathroom wall! The job proved a little bit more involved than anticipated because the window trim was glued to the framing which meant that it all had to be replaced.
  • Since returning from vacation work has been taking up a lot of time and more energy.
  • I have been giving the kayak a good amount of time in the water.
There has been a bit of woodworking as well.

Hiker Boy's Advent Calendar
Photo Sharing and Video Hosting at Photobucket
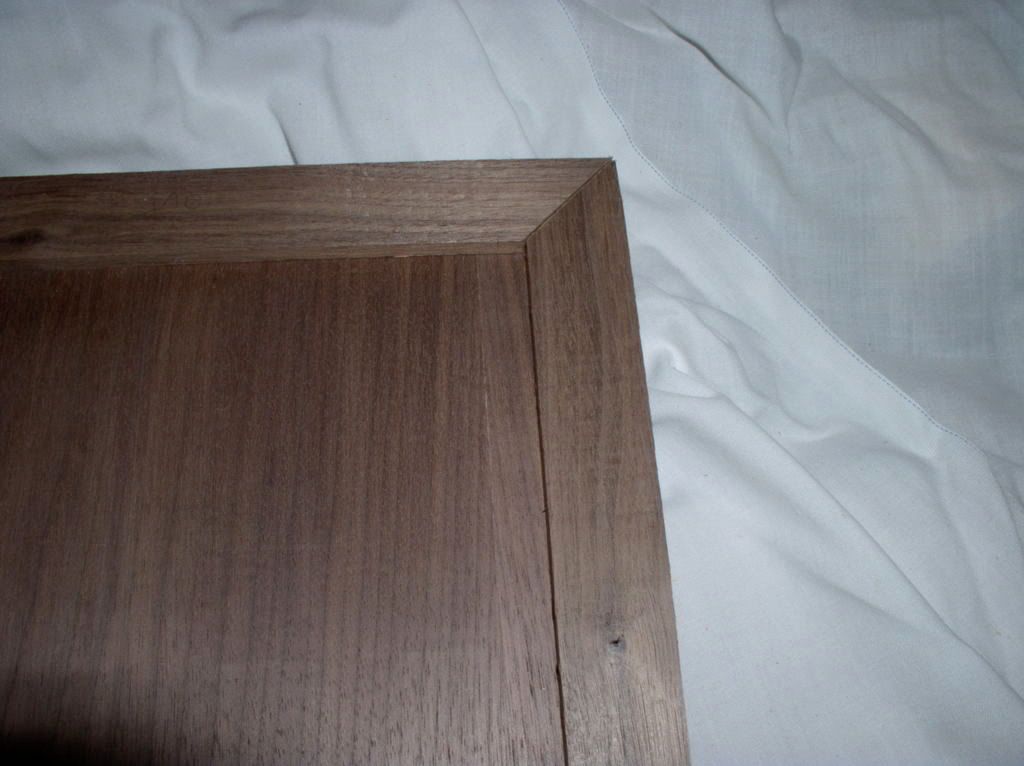
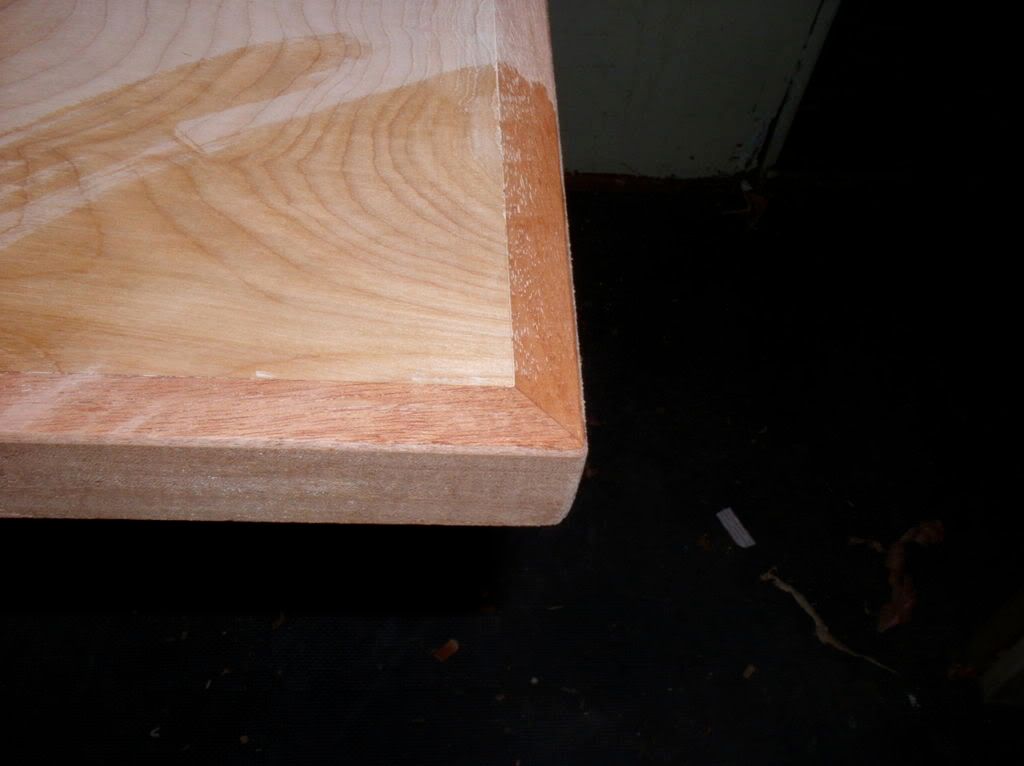
The stock for all parts has been milled, and I'm ready to start joinery. The drawer stock still needs to be cut to final dimension. The picture above is the corner of one of the doors.

Softball Bat
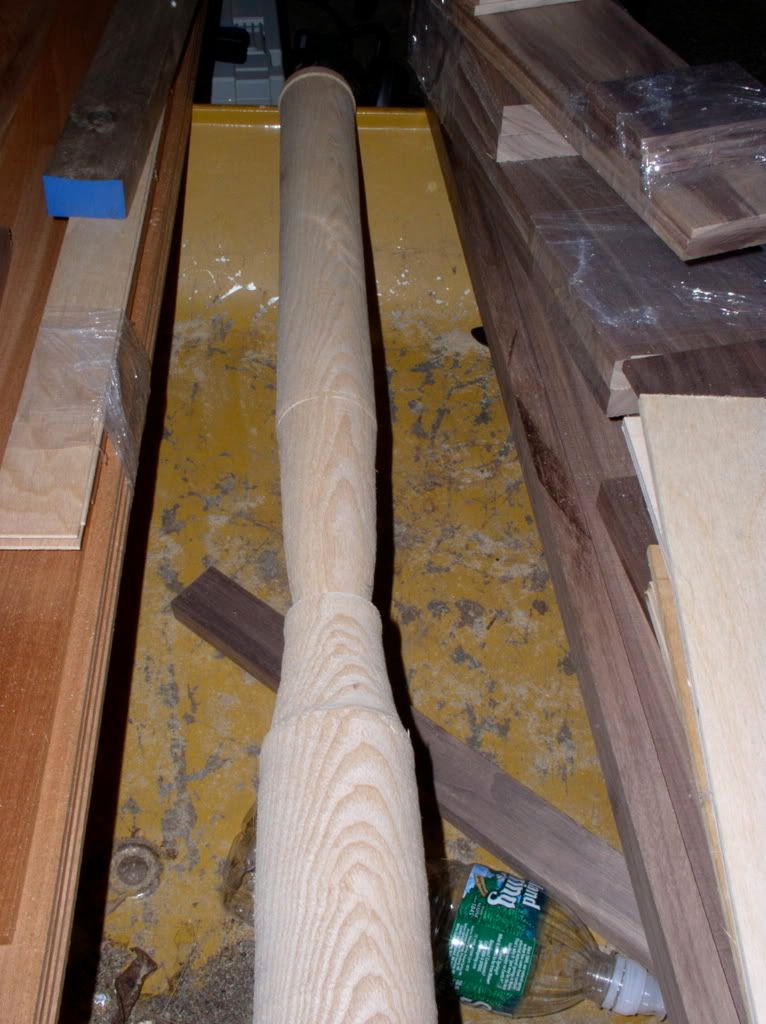
This is a new addition to the list. Last spring many of the guys in my woodworking class made baseball bats. One evening as I was leaving the instructor commented that I was the one who should be making a bat. He's aware of my participation in the softball league at work (I help run our team, play, umpire and coordinate the umpires for the league). And when he found out that I'd never used a lathe he was even more convinced that I should give it a try. I didn't have anything else to work on for the last class, so I decided to give it a try. Here's the progress so far. I should have it mostly finished next week when class starts again.
Photo Sharing and Video Hosting at Photobucket


Workbench Top

Photo Sharing and Video Hosting at Photobucket
The new top for the bench is almost complete. I used mahogany to edge the plywood. It's attached using biscuits which gave me an excuse to use my biscuit joiner. I attached it so it was a little higher than the surface of the plywood and then planed it down. The only thing left to do is to apply a finish to it. I'm leaning toward using boiled linseed oil.

Footstools

I filled the grain on the footstools with a mixture of pumice and boiled linseed oil. They look great, but need a lot of sanding. I've got the top of one done and it feels great after the sanding.

Ornament
owl ornament
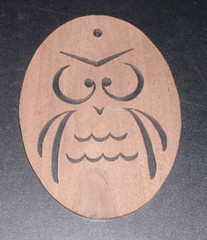
Almost every year for the last 10 I've made a window hanging/Christmas tree ornament using my scrollsaw. The one pictured above is from 2005. Much to Amy's amazement I have already got the first pass of this year's design done. I'll try this one out and then make adjustments before starting in on the production run.

Friday, June 15, 2007

Current Work

I haven't been spending quite as much time in the shop since the challenge table was completed. What I have been working on is getting finish on the other projects which are ready for it.

First up is the nightlight since we don't want Snowflake to be a teenager before he gets it. I'm finishing it before I assemble it. I've got stain on all the parts. Next up is the finish coat. I'm going to go with polyurethane for that. I should get to this on Monday.

I've also done a little final sanding on the wall cabinet. I've also decided one of the doors needs a slight adjustment - it's rubbing on the bottom. That'll be a round of planing. Then I'll stain the walnut panels on the doors and the shelves which are also walnut. I think I'm going to finish it off with shellac.

Next up will be the foot stools. I've found a recipe for grain filler that uses pumice and boiled linseed oil. I've got the ingredients, just need to find a time to try it out. The grain needs to be filled because the hickory has open grain. Stay tuned for progress and pictures.

In class (Thursday nights till mid July) I've been working on hiker boy's advent calendar. Last week I remilled/recut the wood for the case. The design of this was still evolving at that point (I finished it last night) and when I first cut the case parts I forgot to leave room for drawer handles inside the case. Last night was more milling and a little bit of cutting.
  • planed the stock for the drawer fronts
  • jointed, planed and cut the stock for the door stiles and rails
    • I may have to repeat this since some of the pieces sprung into a lovely curve after cutting
  • jointed, planed and resawed (explanation below) stock for the drawer sides
Resawing
When looking for a thin piece of wood there are basically 3 options - buy thin lumber which is expensive, plane a thicker piece which can waste a lot of wood, or resaw which maximizes the use of the lumber. Basically what a woodworker means when they saw they resawed a piece of lumber is that they cut the wood into thin strips. A lot of times this is done on a band saw which has a blade that is a loop (think rubber band) with teeth on one edge. This can also be done on a table saw - usually by raising the blade to 1/2 the height of the wood and running the wood through twice. Or a combination of table saw and band saw can be used - run it through the table saw to get most of the wood cut away and finish up on the band saw.

The reason the band saw is the preferred method is the blade is much thinner so there is less waste. But because the blade is thinner it is harder to get a straight cut. It's a trade off and there are lots of products to help.

Since the piece I was resawing was not very wide (2") I just cut it in one pass on the table saw. Yes, I used a push stick! Next time I'll run the cut pieces through the planer to even them up.

On tap for next week -
  • recutting the pieces for the door frames
  • cutting plywood panels for the doors, drawer bottoms and back
  • milling and cutting pieces for the drawer supports/dividers

Tuesday, May 29, 2007

Lots of Progress

I have been remiss in not posting about all of the progress I've made in the last month of so. Here's a recap by project.

Wall Cabinet
The wall cabinet is ready for finish.

Foot Stools
The foot stools are ready for finish. I've been wondering about how to fill the grain, since the hickory has a very open grain pattern. While looking for something else in my stash of saved woodworking magazine articles I found one I'd saved on non-commercial grain filler. One option is to use pumice and boiled linseed oil. I've had a box of pumice sitting on the shelf for years (for use as a sanding agent when finishing) so I bought a can of boiled linseed oil. I'm going to give this a try before adding finish to the stools.

Night Light
Ready for finish. The panels look great (pictures soon). I'm going to apply finish before I glue up the box, so I have more control over the finish. I need to get this done ASAP since Snowflake made his appearance 3 weeks ago.

Hiker Boy's Advent Calendar
I've got the plan sketched out and started cutting the parts during my last couple of classes. I've got the sides of the case ready, although I may have to check that I left room to affix the back.

CD Holder
Adjusted the height of the dividers. It's ready for dadoes and rabbets.

Challenge Table
This has been garnering most of my attention. I started to include a report here, and then realized that it make this post extremely long. So, I'll post about that separately.

Sunday, March 25, 2007

Ready for Finish

The stools are now ready for finish.

I spent a little time sanding yesterday, but otherwise didn't work on them this weekend.

It is not an optical allusion - they are in fact slightly different sizes. That's a result of the lumber I had and at least one cutting error. Once they aren't sitting side by side no one will ever know, except of course all of you and I know you won't tell. Right?

Wednesday, February 14, 2007

Stool Progress

I'm building two small stools. Wood is hickory and walnut. I've been using stool #1 to test methods before working on stool #2. I finished assembly on stool #1 on Sunday. It's all hickory with a band of darker hickory in the center of the top. The shelf is dadoed into the sides and secured with pocket screws.

The top is screwed into the sides and the screw holes are plugged with homemade plugs. I don't own a drill press so I use a piece of scrap with a hole sized to the outside of the plug cutter to guide the cutter. (I'll post a picture in the next couple of days so this is clearer.) I didn't have/couldn't find enough light colored scrap to make the four plugs for the top of this stool, so I decided to use darker wood and make the plugs a design feature. I cut a bunch of plugs, for both stools, and pulled out four that looked like they offered good contrast.

It wasn't until Monday night when I trimmed the plugs flush that I discovered that I'd used one lighter plug on the stool. The picture to the left shows the offending plug - just to the right of the darker band. Needless to say I drilled out this plug and replaced it. (Sure hope the new one has better contrast.

I haven't gotten back to stool number 2 yet, maybe tomorrow.

Saturday, January 20, 2007

Progress on Stools

With all of the varnish on the garage door, I got to spend time in the workshop last night. Work on the foot stools progressed. I finished the dadoes. The stools are hickory and walnut. Stool number 1 has a strip of walnut in the center of the top, stool number 2, seen here, has walnut at the edges of each of the pieces.

I made a jig to cut the dadoes. The jig is two pieces of mdf, one slightly larger than the other. I screwed the two together with the larger piece on the bottom, then using the upper board as a guide trimmed the lower one with a straight bit and collar in the router - thus making the bottom edge match the edge of the bit. I had to finish up with chisels since the two passes with the router didn't come out evenly. I think the reason was that I had the assembly clamped to my workmate and I didn't have anything underneath the workpiece to support it. I'll have to remember that next time.

I did learn an important lesson while making the jig - don't expect the same bit to cut in exactly the same place with the fixed base attached as it does with the plunge base. I learned this the hard way, but was able to solve the problem.